Render Targets as Material masks
Using Render Targets as Material masks in Unreal
Published on January 26, 2026 by Simsaladoo
sample post test
3 min READ
Render Targets (RTs) are a special use-case tech in Unreal for when you need a texture to be able to update at runtime, or even in editor. They’re used for minimaps, portals, live monitors, dynamic painting in VR, depth maps, snow and material edits and plenty of other custom solutions. Typically you’d use a material “stamp” to paste draws onto the RT like a canvas–which is what the functions in Unreal are named that refer to the RT update process.
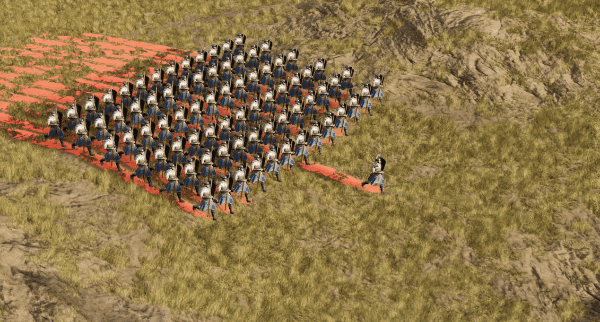
More recently I had to use this on a Fortnite trailer to make grass trample down when a large force of combatants walked across a field. (You can watch that trailer here https://www.youtube.com/watch?v=7ZIbokU9tRg but the scene was ultimately cut down in editorial). The most common way of doing this is attaching locators to the feet of a character and then using those coordinates to apply the material stamp into a master Render Target. However what if there are hundreds of these characters? Without enough time to create a script to attach them all, I needed to be able to get this done really quickly, so here’s the process I came up with.
Render Target settings
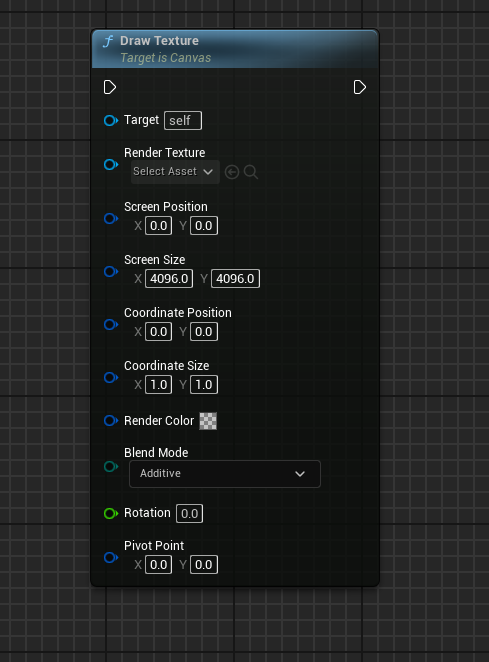
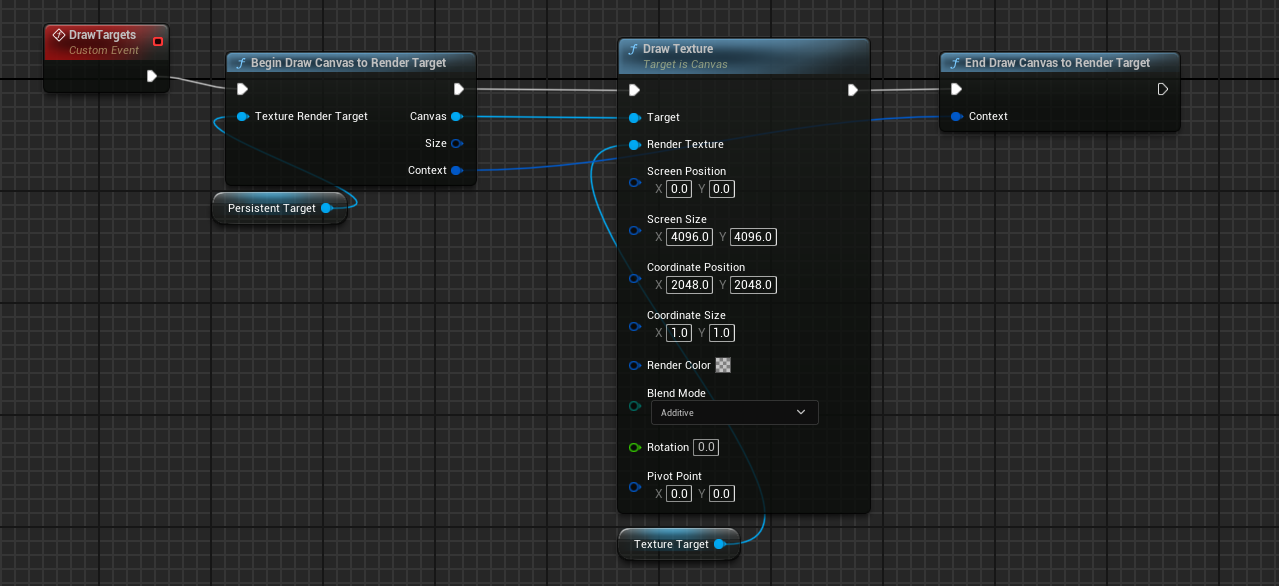
The usual way of drawing into a Render Target is via “Draw Texture” where it takes in a target target and applies it to the Render Texture. In my case, the Render Texture is the persistent texture mask applied to grass geo, landscapes, etc, and the Target is my SceneCaptureComponent2D’s output.
Basically one RT draws onto another RT. To make this work properly, the screen size was set to the same resolution as the RT, and the Blend Mode is set to Addative. The render color is set to have a 0 Alpha so it doesn’t overwrite any existing values once the painting begins.
Using within sequencer
Now this drawing needs to be done on Tick in order for the painting to be continuous, so the above DrawTargets function can be added to the same actor containing the SceneCaptureComponent2D so it can easily reference the target RT. It can also be triggered from within SequenceDirector and reset/cleared via event triggers.
One downside to using this method is if you have a long path that needs to be trampled before shot export, you’ll either have to add head frames to allow for drawing, or clear the RT and apply a separate mask that contains the pre-trampled regions. Luckily Unreal makes it simple to save out render targets as textures, so you can easily manipulate the actors in-editor and create these regions as needed.
Render Target performance considerations
Now in this example the region covered is quite large, and used a 2k Render Target which is extremely heavy (~16MB). RT textures use more virtual memory than a regular static texture so it usually best to reduce them as much as possible.
One easy trick is to set them to R8 formats so you only use the Red channel which brings it down to 4MB @ 2K. The two Render Targets also don’t necessarily need to be the same size either, but requires you to code up a way for the Coordinate Position and Screen Sizes to be organized based on these.
This method worked fairly well even though the stamp in this case draws the whole character’s shape in as a stamp. But for adding trample to hundreds of characters it did get the job done.